There is a very simple registry tweak we can implement to prevent users from writing data to a USB devices like flash disks or external hard drives. This sort of thing is usually done at schools and company's that don't want their students or employees to download files off the internet or copy sensitive company information, to take home.
To disable writing to USB devices, follow these simple steps:
- Press Windows key + R (This brings up the Run dialog box)
- Type regedit and press Enter (The open up Registry Editor)
- Navigate to:
HKEY_LOCAL_MACHINE\SYSTEM\CurrentControlSet\Control
- Right-click on Control and goto New -> Key [See pic below] 
- Type StorageDevicePolicies as the name for the new Key
- Right-click the newly created StorageDevicePolicies and goto New -> DWORD (32-bit) Value[See pic below] 
- Type WriteProtect as the name for the new DWORD value.
- Double-click WriteProtect and set its value to 1 [See pic below] 
- You can now close Registry Editor.
From now onward, every time someone tries to write data to a USB drive will be presented with a write-protect message!
Don't want your XP computer to show up in Network Neighborhood or My Network Places? One way to accomplish that is to disable file sharing. A simple enough solution, but what if you want to share folders with certain users and not let others see your computer or its shares while browsing My Network Places?
Do the following to achieve this:
- Click Start -> Run (this brings up the Run dialog box)
- In the Run dialog box, type cmd and press Enter (This brings up the Command Prompt window)
- In the Command Prompt type net config server /hidden:yes and press Enter 
Your computer will no longer be visible when browsing My Network Places. Your shares however, will still be available via your UNC path (\\ComputerName\ShareName)
1) Click on theStart Menu.
2) Where it says “Start Search” enter regedit and hit Enter.
3) A pop up will come up (UAC), just click Continue.
4) Once in regedit go to HKEY_LOCAL_MACHINE\Software\Microsoft\WindowsNT\CurrentVersion\Winlogon
5) In the left panel, right click on Winlogon and click New and click Key.
6) Type SpecialAccounts and press Enter.Below is how you should be doing so far.

7) In the left panel, right click on SpecialAccounts and click New and click Key.
8) Type UserList and press Enter.
9) In right panel of UserList, right click on a empty area and click New then click DWORD (32bit) Value.
10) Type in the name of the user account that you want to hide and press Enter.eg: Everyday Account. Below is how you should be doing so far:

11) In the right panel, right click on the user account name and click Modify.
12) To hide the user account - Type 0 and click OK. (number zero not the letter)
Whenever you want to use the account just unhide the it by typing 1 instead of zero.

13) Close regedit and your done, enjoy your secret account =).
I often need to drop to a command prompt to get various tasks done. The ability to right-click a folder and instantly open a command prompt can be very handy indeed. You could do this by way of a powertoy in Windows XP. With Windows Vista it's already there.
- Press Shift and right-click a folder you want to open a command prompt from.
- Select Open Command Window Here[See pic below] 
The Windows XP Welcome screen. Pretty pictures for each user account. What a nice thought on Microsoft's part. The only trouble is - I want to create an administrator account, and not have others tempted to try getting into it while they are on my computer.
When windows XP is not joined to a domain, it displays a welcome screen when it first boots:
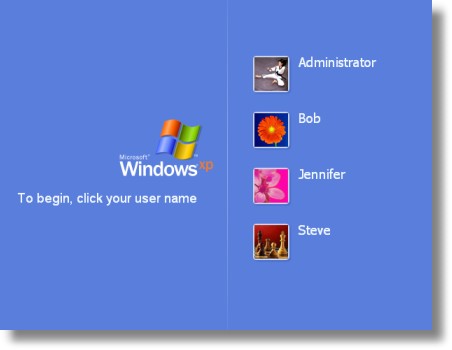
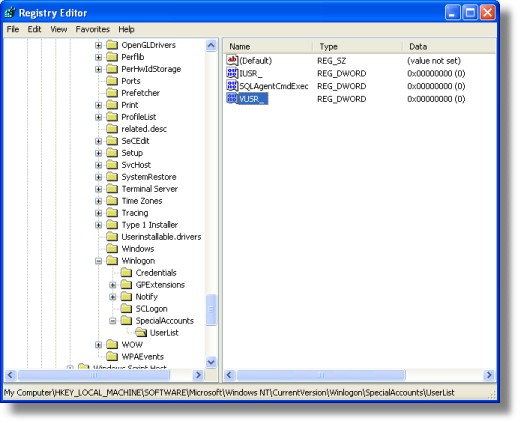
The welcome screen displays all of the local users on the system, except the built-in administrator account that was created during setup. If we want to hide a specific user from the list, we need to create a special value under this registry key:
HKEY_LOCAL_MACHINE\Software\Microsoft\Windows
NT\CurrentVersion\Winlogon\SpecialAccounts\UserList
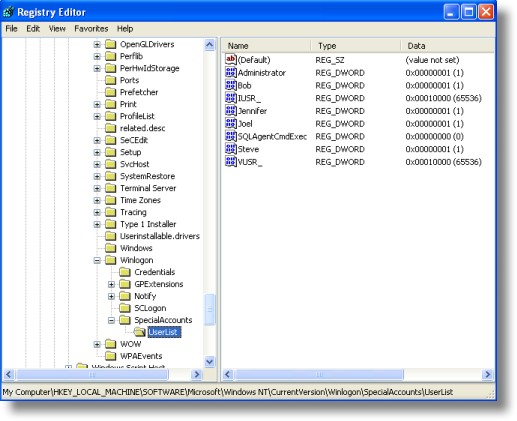
Under this key you simply create a new DWORD value - the name matches the users name exactly, and the value is one of the following (Decimal format)
0 - Hides the user just from the welcome screen
1 - The user is shown
Before you start putting values in this key, I want to warn you. This tip is particularly dangerous. If you make the wrong move, you could make it nearly impossible to get back into your system. Don't blame me if you hose your system!
To hide the users I want, I browse to the registry key on my system:
Now I want to hide all of the accounts except Jennifer, so I add each of the accounts shown on the welcome screen, and give them a value of zero.
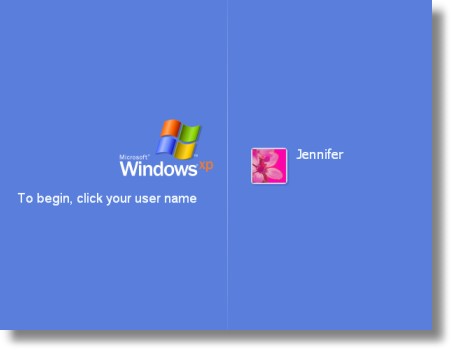
that's all we need to do. I log off, and now I only see Jennifer's account:
Here's the big question. How do you log on as a hidden user? If you are running windows XP Professional you simply need to press CTRL-ALT-DEL twice, and the standard logon screen will be displayed. This has one pitfall - it will fail to work if a user is still currently logged in. If you are having trouble getting it to show, then reboot and press it twice before any users have logged in. Secondly, if you are running Windows XP Home, you will need to boot in safe mode to use the hidden account. The CTRL-ALT-DEL trick does not work for XP Home.
Now here is the cool part. We have made a program that will do this for you. No need to mess around in the registry!
The program, while easier, does not exclude you from the danger I spoke of before. Please think about what you are doing before you remove a user from the list!

Just download it from here
As always we do not have any spyware, or adware in our freeware, and just like most of our freeware this program will run fine from a floppy, CD-Rom, or USB flash drive...no installation needed.

