There is a very simple registry tweak we can implement to prevent users from writing data to a USB devices like flash disks or external hard drives. This sort of thing is usually done at schools and company's that don't want their students or employees to download files off the internet or copy sensitive company information, to take home.
To disable writing to USB devices, follow these simple steps:
- Press Windows key + R (This brings up the Run dialog box)
- Type regedit and press Enter (The open up Registry Editor)
- Navigate to:
HKEY_LOCAL_MACHINE\SYSTEM\CurrentControlSet\Control
- Right-click on Control and goto New -> Key [See pic below] 
- Type StorageDevicePolicies as the name for the new Key
- Right-click the newly created StorageDevicePolicies and goto New -> DWORD (32-bit) Value[See pic below] 
- Type WriteProtect as the name for the new DWORD value.
- Double-click WriteProtect and set its value to 1 [See pic below] 
- You can now close Registry Editor.
From now onward, every time someone tries to write data to a USB drive will be presented with a write-protect message!
Don't want your XP computer to show up in Network Neighborhood or My Network Places? One way to accomplish that is to disable file sharing. A simple enough solution, but what if you want to share folders with certain users and not let others see your computer or its shares while browsing My Network Places?
Do the following to achieve this:
- Click Start -> Run (this brings up the Run dialog box)
- In the Run dialog box, type cmd and press Enter (This brings up the Command Prompt window)
- In the Command Prompt type net config server /hidden:yes and press Enter 
Your computer will no longer be visible when browsing My Network Places. Your shares however, will still be available via your UNC path (\\ComputerName\ShareName)
1) Click on theStart Menu.
2) Where it says “Start Search” enter regedit and hit Enter.
3) A pop up will come up (UAC), just click Continue.
4) Once in regedit go to HKEY_LOCAL_MACHINE\Software\Microsoft\WindowsNT\CurrentVersion\Winlogon
5) In the left panel, right click on Winlogon and click New and click Key.
6) Type SpecialAccounts and press Enter.Below is how you should be doing so far.

7) In the left panel, right click on SpecialAccounts and click New and click Key.
8) Type UserList and press Enter.
9) In right panel of UserList, right click on a empty area and click New then click DWORD (32bit) Value.
10) Type in the name of the user account that you want to hide and press Enter.eg: Everyday Account. Below is how you should be doing so far:

11) In the right panel, right click on the user account name and click Modify.
12) To hide the user account - Type 0 and click OK. (number zero not the letter)
Whenever you want to use the account just unhide the it by typing 1 instead of zero.

13) Close regedit and your done, enjoy your secret account =).
I often need to drop to a command prompt to get various tasks done. The ability to right-click a folder and instantly open a command prompt can be very handy indeed. You could do this by way of a powertoy in Windows XP. With Windows Vista it's already there.
- Press Shift and right-click a folder you want to open a command prompt from.
- Select Open Command Window Here[See pic below] 
The Windows XP Welcome screen. Pretty pictures for each user account. What a nice thought on Microsoft's part. The only trouble is - I want to create an administrator account, and not have others tempted to try getting into it while they are on my computer.
When windows XP is not joined to a domain, it displays a welcome screen when it first boots:
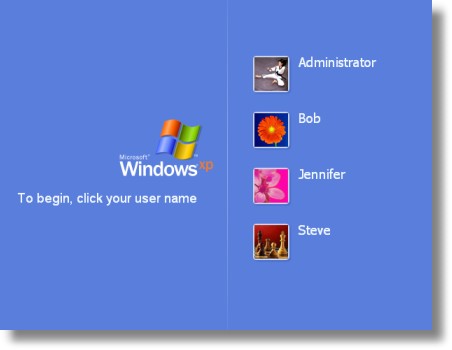
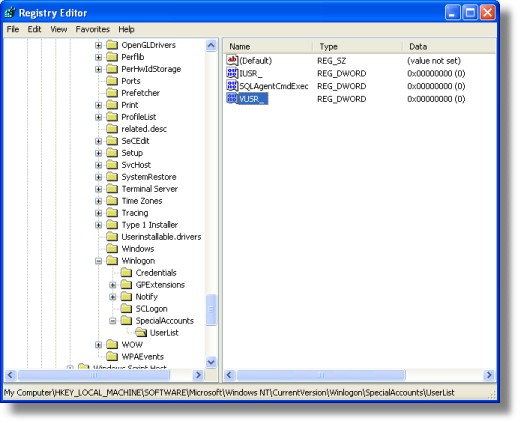
The welcome screen displays all of the local users on the system, except the built-in administrator account that was created during setup. If we want to hide a specific user from the list, we need to create a special value under this registry key:
HKEY_LOCAL_MACHINE\Software\Microsoft\Windows
NT\CurrentVersion\Winlogon\SpecialAccounts\UserList
Under this key you simply create a new DWORD value - the name matches the users name exactly, and the value is one of the following (Decimal format)
0 - Hides the user just from the welcome screen
1 - The user is shown
Before you start putting values in this key, I want to warn you. This tip is particularly dangerous. If you make the wrong move, you could make it nearly impossible to get back into your system. Don't blame me if you hose your system!
To hide the users I want, I browse to the registry key on my system:
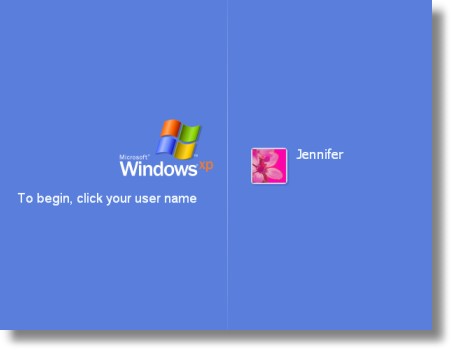
Now I want to hide all of the accounts except Jennifer, so I add each of the accounts shown on the welcome screen, and give them a value of zero.
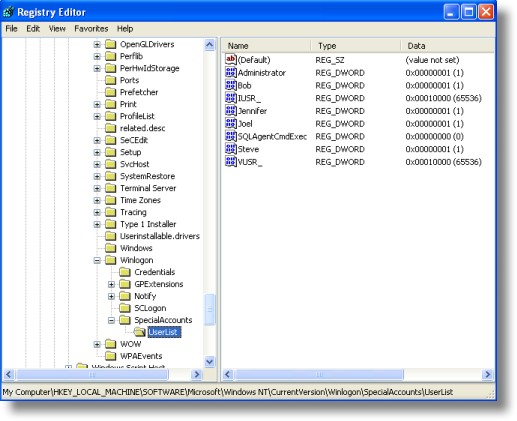
that's all we need to do. I log off, and now I only see Jennifer's account:
Here's the big question. How do you log on as a hidden user? If you are running windows XP Professional you simply need to press CTRL-ALT-DEL twice, and the standard logon screen will be displayed. This has one pitfall - it will fail to work if a user is still currently logged in. If you are having trouble getting it to show, then reboot and press it twice before any users have logged in. Secondly, if you are running Windows XP Home, you will need to boot in safe mode to use the hidden account. The CTRL-ALT-DEL trick does not work for XP Home.
Now here is the cool part. We have made a program that will do this for you. No need to mess around in the registry!
The program, while easier, does not exclude you from the danger I spoke of before. Please think about what you are doing before you remove a user from the list!

Just download it from here
As always we do not have any spyware, or adware in our freeware, and just like most of our freeware this program will run fine from a floppy, CD-Rom, or USB flash drive...no installation needed.
Windows 7 Feature Focus
Action Center
While previous versions of Windows included a feature called Windows Security Center that monitored the various security features of the system, Windows 7 takes this functionality to the next level with Action Center. In addition to monitoring security, Action Center also monitors the OS's maintenance features and consolidates alerts from numerous Windows features into a single interface. Read more...
Aero Peek
This replacement for Show Desktop in Windows 7 lets you "peek" behind all of the open windows on your desktop and easily view and Windows Gadgets or files on your desktop. You can also peek into the contents of specific open windows. Read more...
Aero Shake
Windows 7 includes a unique new way to minimize all windows except for the currently selected window: Just grab it by the title bar and shake vigorously. It's called Aero Shake! Read more.
Aero Snaps
By dragging open windows in certain ways, you can "snap" them to the edges of the screen, maximize, or minimize. This obviates the need to click tiny onscreen elements, making these features more accessible to users. Read more...
Aero Themes
In Windows 7, Microsoft combines various system preferences--including the desktop background, the Aero glass window color, the system sounds, and the screen saver--into Aero Themes you can customize, save, and share with others.Read more...
Bitlocker To Go
The full-drive encryption feature that first debuted in Windows Vista has been updated in Windows 7 to support removable USB storage devices like flash memory drives and portable hard drives. Read more...
Calculator
The Windows Calculator utility inexplicably receives a major upgrade in Windows 7 with calculation history, unit conversion, calculation templates, data calculations, and other new features. Read more...
Scenic Ribbon, Paint, and WordPad
Microsoft has evolved the Ribbon control from Office 2007 and made it part of the operating system in Windows 7. This new version of the Ribbon, called the scenic Ribbon, is used by two Windows 7 applications, Paint and WordPad, and can be used by third party applications going forward as well. Read more...
Windows Experience Index
The Windows Experience Index continues in Windows 7, but like Nigel's amp in "Spinal Tap," it now goes to 11. Well, to 7.9. Read more...
Windows Gadgets
The Windows Sidebar disappears in Windows 7, but the Gadgets continue on and are integrated with the desktop. Read more...
Windows Live Essentials
Available as an optional download, Windows Live Essentials is an application suite that includes a number of new versions of classic Windows applications, including Windows Live Mail (email and calendar), Windows Live Photo Gallery (photos), Windows Live Messenger (instant messaging), Windows Live Movie Maker (video editing), Windows Live Family Safety (enhanced parental controls), and more. Read more...
Windows Taskbar
The Windows Taskbar has been dramatically enhanced in Windows 7 to minimize clutter. New Taskbar features like Jump Lists, fly-over and full-screen icon previews, and more. Read more...
Accessibility improvements.
Microsoft has revamped the accessibility features in Windows 7 with improved speech recognition and a new Magnifier utility with full-screen and lens-mode views.
Backup and Restore.
Windows Vista's stellar backup and restore features have been streamlined and simplified in Windows 7. Like its predecessor, Windows 7 supports both data backup and image-based system backup, but now the UIs are more segregated.
Blu-Ray support.
Windows 7 natively supports Blu-Ray optical discs and enables you to write to Blu-Ray recordable media.
Credential Manager.
The new and improved Windows 7 Credential Manager lets you save credentials, like user names and passwords, so that you can more easily logon on to Web sites, networked computers, and other resources automatically. Credentials are saved in the Windows Vault and can be backed up and restored to encrypted Managed Information Card (MIC) files. (Credential Manager uses Windows CardSpace technology.)
Device Stage.
This Longhorn-style user experience will be made available for multi-function devices such as smart phones, multifunction printers, portable media players, and the like. Through this UI, you'll be able to access the features that are unique to each device. Each Device Stage page can be extensively customized by the device maker.
DirectAccess.
This feature is aimed at business users who need to securely access corporate network resources while away from the office. Essentially a simple replacement for VPN connections, DirectAccess requires Windows Server 2008 R2 on the server-side.
DirectX 11.
Windows 7 includes the latest version of the DirectX multimedia libraries.
Display improvements.
Windows 7 includes numerous improvements related to computer displays, including integrated display color calibration, improved high DPI support, ClearType, and improved support for external displays. A new Windows Key + P keyboard shortcut helps you easily switch between connected displays.
Getting Started.
This replacement for Windows Vista's Welcome Center no longer appears the first time you boot into the Windows desktop, but it still provides a central location for discovering new features, personalizing the system, transferring data from your previous Windows PC, and discovering and launching other common tasks.
HomeGroup.
Microsoft has consolidated the most common network-based sharing tasks into a single simple interface called HomeGroup. Computers in a HomeGroup can easily share documents, digital media files, and printers over a home network.
Internet Explorer.
Windows 7 ships with the latest version of Microsoft's Web browser, Internet Explorer 8.
Libraries.
In Windows 7, Microsoft has realized a long-term goal to replace the static special shell folders from previous Windows versions and replace them with virtualized shell locations that aggregate content from a variety of physical locations. Libraries are implemented as virtual folders and the views they present are the results of search queries. Libraries are also the basis for HomeGroup file and digital media content sharing.
Location-Aware Printing.
Windows 7 utilizes different default printers for each of the network locations you've configured on the system so you won't mistakenly print a child's school project to the work printer. When you're at work, you'll print to the work printer, and when you're at home, you'll print to the home printer.
MinWin.
The componentized core of Windows 7, which includes both the traditional operating system kernel as well as the minimum necessary surrounding support technologies to create a bootable (and, for Microsoft, testable) system. Note that, in Windows 7, MinWin isn't a feature per se but is rather the foundation upon which the rest of the OS is built.
Parental Controls.
The parental control functionality that debuted in Windows Vista is updated in Windows 7 to support multiple games rating systems and parental control providers.
Problem Steps Recorder.
Windows 7 includes a new utility called the Problem Steps Recorder that captures screen shots of the steps a user is taking so that help desk personnel can provide a fix without physically having to visit the desktop.
ReadyBoost.
ReadyBoost first appeared in Windows Vista, providing users with a way to cheaply and easily improve the performance of their PCs by utilizing a USB memory key as a memory cache. In Windows 7, ReadyBoost is improved in numerous way: It supports multiple memory devices, can work with USB memory keys, Secure Digital (SD) memory cards, and other internal flash devices, and supports over 4 GB of storage.
Sensor support.
Windows 7 includes support for hardware-based sensors, including GPS-based location sensors.
Start Menu (Enhanced).
The Windows 7 Start Menu is an enhanced version of the Start Menu that debuted in Windows Vista.
Startup Repair.
While this useful tool did debut with Windows Vista, it wasn't installed on PCs by default. In Windows 7, it is installed into the OS partition automatically and appears automatically when the system can't boot properly, fixing any problems and returning the system to its normal booting state.
Sticky Notes.
The Sticky Notes utility loses the bizarre Windows XP-style interface from previous Windows versions and supports ink and text input.
System Restore.
The Windows 7 version of System Restore works as before, providing a way to non-destructively return a PC to a previous point in time, but is more reliable, predictable, and effective than its predecessors.
Tablet PC.
After making Tablet PC functionality available more broadly in Windows Vista, Microsoft is improving this technology in Windows 7 with better handwriting recognition that has improved accuracy, speed, and support for math expressions, personalized custom dictionaries, and 13 new languages.
User Account Control.
While much reviled by certain users, the User Account Control (UAC) feature that debuted in Windows Vista played a huge role in making that system the most secure Windows version yet. In Windows 7, UAC is extensively updated to be less annoying, and the overall system has been fine-tuned to minimize the number of UAC prompts that interrupt users.
View Available Networks.
Windows 7 includes a new Jump List-based utility for finding and connecting to Wi-Fi, mobile broadband, dial-up, and VPN connections. Unlike the similar UI in Windows Vista, this utility, called View Available Networks, does not require you to navigate through a series of dialogs and windows.
Virtual Hard Disk support.
Windows 7 allows you to mount a Virtual Hard Disk (VHD) as a drive in Explorer so that you can navigate its contents like a physical hard disk. It also supports the ability to boot from VHD images.
VPN Reconnect.
Windows 7 users who still need to make traditional VPN connections will benefit from a new VPN Reconnect feature that automatically reestablishes a VPN connection when you temporarily lose Internet connectivity.
Windows Anytime Upgrade.
This utility debuted in Windows Vista but was found to be too confusing for most users, so the electronic upgrade capability was removed. In Windows 7, Windows Anytime Upgrade returns to electronic upgrading and Microsoft promises you'll be able to upgrade from one version of Windows 7 to another in about 10 minutes now.
Windows Defender.
The malware and spyware protection utility from Windows Vista continues in Windows 7 with a few changes: It's been integrated into the new Action Center and its centralized notification system. But Defender also drops the useful Software Explorer feature, so users will have to look elsewhere for a way to prevent unwanted applications from running a startup.
Windows Easy Transfer.
The Windows Easy Transfer utility that debuted in Windows Vista has been substantially updated with a new user interface and new capabilities. As before, Easy Transfer helps you transfer files, folders, and program and system settings from your previous Windows install to your new one. This time around, however, the process is simpler and more streamlined.
Windows Media Center. Microsoft's ten-foot UI for digital media content is improved with a slightly enhanced user interface, multi-touch support, HomeGroup integration, and various global broadcast TV standards.
Windows PowerShell. Windows 7 ships with the Windows PowerShell 2.0 scripting environment and the Windows PowerShell Integrated Scripting Environment (ISE).
Windows Search. Windows 7 comes with the latest version of Windows Search, and unlike the version that first shipped with Windows Vista, you can now obtain instant search results from network-based file shares as well as local hard drives. Microsoft has also improved the performance of local searches, sorting, and grouping.
Windows Touch. Windows 7 builds on the Tablet PC and touch capabilities from previous Windows versions and adds pervasive support for multi-touch. All of the major UI components, including the Start Menu, Windows Taskbar, and Explorer, are touch-friendly in Windows 7.
Windows Troubleshooting. This new Windows 7 feature diagnoses and resolves common operating system and hardware issues. It works automatically, or you can visit the Troubleshooting control panel to find problems to troubleshoot. Windows Troubleshooting integrates with Action Center so you'll be notified when relevant new troubleshooters from Microsoft and third parties are made available.
Windows XP Mode. Formerly called Virtual Windows XP (VXP), this solution provides users with the ability to run many older Windows XP applications in a virtual Windows XP environment, side-by-side with native Windows 7 applications.
Step 1 - Installing WDS on your Windows 2003 Server SP2
- Logon to the Server with Domain Administrator rights
- Navigate to the control panel and click Add/Remove Programs
- Click Add/Remove Windows Components
- Scroll down and check Windows Deployment Services
- Click Next and Finish (once installed WDS can be found under Administrative Tasks)
- Navigate to Start > All Programs > Administrative Tools > Windows Deployment Services (WDS MMC should appear)
- Expand Server and right click [sever name] and click Configure Server
- Click Next to start the Wizard
- Check the Path if needed (I used D:\Remoteinstall because of disk space on system drive C:)
- For DHCP Options 60 Check both "Do not listen on Port 67″ and "Configure DHCP option 60 to "PXE Client" and Click Next
- For PXE Server Initial Settings select "Respond to all (known and unknown) client computers" and click Finish
- Open a web browser and navigate to http://www.microsoft.com/downloads/details.aspx?FamilyId=13F05BE2-FD0E-4620-8CA6-1AAD6FC54741&displaylang=en
- Save download locally to the server and install
- Once installed you will need to launch Workbench and added any required components
- Enable network boot option in BIOS
- Install Operating System - In my case I installed a Volume Copy of Windows XP Professional SP2
- Join to the Domain and install needed Application and Updates
- Remove from Domain
- Create a folder on the sever to copy two WIM files to (WinPE.WIM and Boot.WIM)
- Insert a Vista Business DVD in to the DVD-ROM drive and browse the Disk for a file called Boot.WIM and copy to folder recently created folder
- Navigate to Program Files\Windows AIK\Tools\PETools\x86\WinPE.WIM and Copy to recently created folder
- Now I opened up WDS expanded Server and right clicked the Boot Image Folder and Clicked Add Image
- Browsed to Boot.WIM and click OK
- Repeated for WinPE.WIM and click OK
- Next, In WDS I right clicked WinPE and Clicked Capture Image
- Finally, In WDS I created a Master Image Group called "Windows XP Image"
- To Run the sysprep I inserted the XP Professional SP2 Disk and Browsed to the deploy.cab file (in my case it was D:\Support\Tools\Deploy.cab)
- I used WinZip to extract the Deploy.cab file to a new folder I created called sysprep (C:\sysprep
- Navigate to the C:\sysprep folder and launch setupmgr.exe
- Click Next to Start the Wizard
- Select "Create new" and click Next to continue
- Select "Sysprep setup" and click Next to continue
- Selct "Windows XP Professional" and click Next to continue
- Select "No,do not fully automate this installation" and click Next to continue
- For Gernerl Settings enter the Name and Organization, Display Settings (default), enter the Time Zone applicable and then enter the Product Key
- For Network Settings select "Automatically generate computer name, Select "Use the following Administrator password (127 characters maximum ; case-sensitive" and enter local administrator password and confirm. Select Typical settings and finally select Workgroup.
- For Advanced Settings specify Country or region, enter area code, Regional Settings select "Specify regional settings in the answerfile" and check "Customize the default regional settings" Click Custom and verify and enter sysprep Identification String (example Windows XP Deployment for Dell Optiplex 755 112007)
- Click Finish and OK
- Click Cancel to Close Setup Manager ( This is an annoying microsoft glitch)
- Now runs Sysprep by navigating back to c:\sysprep and launch sysprep.exe
- Click OK to Continue
- The System Preparation Tool 2.0 windows should appear. Check "Use Mini-Setup and then Click Factory
- Once PC shuts down press the power button to restart the PC (PC will take some time to reboot)
- Once at the Desktop Click Reseal and OK to Shutdown the PC
- PC should Shutdown (do not boot to windows you need to PXE boot and capture the image
- Sysprep is Complete
- Boot up the PC that you want to image and press F12 to enter Boot Menu
- Select Onboard Network Controller and press Enter
- Press F12 again to Boot from network
- Select Windows Vista PE (x86) and press Enter
- From the command prompt type wdscapture.exe
- Click Next to start the WDS Image Capture Wizard
- In the Image Capture Source use the dropdown to select the volume to capture (in my case it was C:\) and enter an Image Name and Image Description. Once complete click Next
- In the Image Capture Destination you will need to browse to a local Destination ( I had problems finding the WDS server when I checked "Upload image to WDS server:")
- Click Finish to begin capturing Image
- Once I had the Image I restarted the Master-Image PC and Join to Domain
- I copied the image file to a local directory on the WDS server
- Once complete I opened WDS and expanded Servers> [Server Name] > Install Image
- Right Click Install Image Group and Select Add Install Image
- Browse to the Image and Click OK to upload the Image to WDS
- Press F2 to access the BIOS and make sure that PXEboot is enabled on the NIC
- Press F12 to access the Boot Menu
- Select "Onboard Network Controller"
- After DHCP issues IP address press F12 to continue
- Select "Microsoft WindowsVista PE (x86)" and press Enter
- Once wpeinit launches type the following:
- Diskpart
- Select disk 0
- Clean
- Exit
- Type exit to let system restart
- Press F12 and Boot from Onboard Network Controller
- Press F12 to continue
- Select "Microsoft Windows Longhorn setup (x86)" and press enter
- Click Next to start the WDS wizard
- Enter the domain administrator's credentials and click OK
- Highlight the Master Image and Click Next
- Highlight Disk0 and Click Next � Installation will begin
- After PC reboots the windows setup should appear click Next to begin
- Select "Yes, I accept" to click Next
- Enter the product Key and click Next
- Enter Computer Name and click Next
- Enter and confirm the local administrator password and click Next
- Select No, don't make this computer part of a domain and click Next
- Click skip and slect No, not at this time and click Next
- Click Finish
- Once PC reboot confirm that you can logon to the desktop as a local administrator
- Reboot in to the BIOS and disable Network PXE
PROBLEM: Not able to configure WDS
CAUSE: REMINST.INF missing
RESOLUTION: Copied the same from service pack files folder
PROBLEM: Not able to PXE Boot to WDS � "WdsClient: An Error occurred while starting networking: a matching network card driver was not hound in this image. Please have your Administrator add the Network driver for this machine to the Windows PE image on the Windows Deployment Services server."
CAUSE: Boot Image missing network driver
RESOLUTION: Need to inject the network driver in the Windows PE image. I used the procedures at http://apcmag.com/5436/customise_windows_pe_2_0
PROBLEM: Reboot after loading the install image generates the corrupt hal.dll message ""Windows could not start because the following files is missing or corrupt: <Windows root>\systems32\hal.dll. Please re-install a copy of the above file."
CAUSE: Hidden partition present and needed to delete
RESOLUTION: Resolution was added to procedures (see above)

